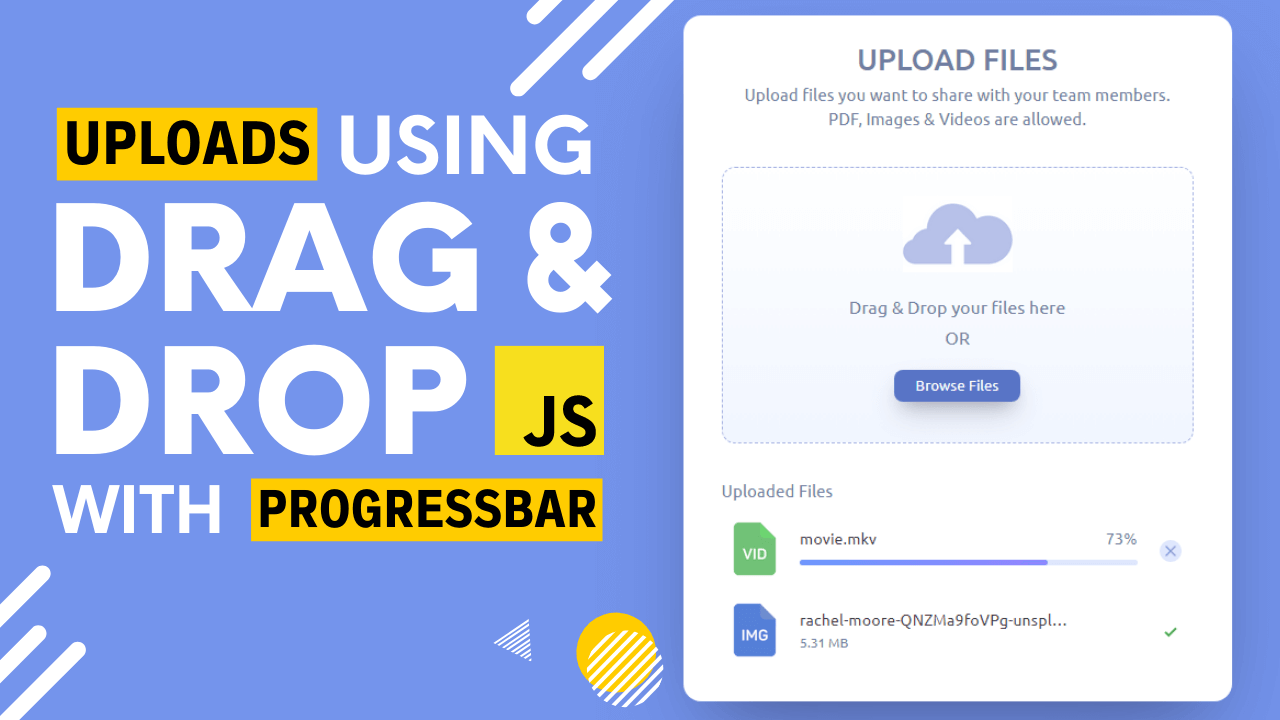
Hi, In this blog post, we will make a complete widget to upload files using the browse button and with drag and drop functionality. Drag and drop have proper animation in a professional way. Files will upload with the progress bar and show the file size on completed. Also, validation of file type will be added. Files will upload to the server using Ajax in JS. All the source code is given below, so, you can also get help from that.
Icons For Project
We need some icon images to represent the type of file. We will use only three types of files Image, Video, and PDF, so we need three types of file icons along with cloud icon, which will use in the drop area.

HTML File
In the HTML file, we will create three sections, the first one for the heading and titles, and another one for the drop area. Everything that will appear inside the drop area will be written in this section. The last section is for the uploaded files list. We will create a container for the list and the list will prepend in the container using JS when a file starts uploading. Get HTML code for this project from GitHub.
CSS File
Get the CSS file for this project from GitHub or you can create your own custom style. In CSS, three classes drag-over-effect, in-prog, and complete added that or not directly used in HTML. We will use these classes in JS. drag-over-effect class creates an effect when a user drags the file over the drop area. in-prog class will add to the uploading file list and show the progressing condition of the list and when this will replace with complete , it will show, the file is uploaded. Other classes are directly used, and if you are a little familiar with CSS, you can understand them easily.
JavaScript File
Now, we will add functionality to our project with JavaScript.
Upload with Browse Button
As we use the browse button also in our design to upload files. So first cover it. We use two buttons for this process. The first one is the input file selector and the other one is a clean button familiar to our design. We hide the input selector button as we cannot design it with CSS. But when we click on the clean visible button, the hidden button will work, with the help of JS using click() function on line 8. So a popup window will open for a user on clicking the clean visible button.
When a user selects some files, run onchange function on that hidden button. This function will execute only when the user has selected at least one file. fileSelectorInput.files have all the selected files. Use foreach loop to get each file. Here, we will validate the file type first using typeValidation() function. We will create this function later. Provide the type of the file as a parameter, if the type is correct, it returns true and the condition becomes true. After that, the upload() function will execute. Make sure to give the file as a parameter to the function. We will make the upload() function later.
Checking File Type
This function gets the type of the file and compares in conditions for validation. It may be application/*, image/* or video/*, or any other type. We are splitting the type on the basis of "/" and comparing the first part. In image and video cases it works. But in the application case, it doesn't work. Because if we compare it will the application, it will also accept "application/zip" or any other that start with the application. For that case, we are comparing the full type with "application/pdf" without splitting. If match, return true.
File Over Drop Area
When the file is over the drop area, we need to make some changes in the drop area to know the user is in the right place and here user can drop the file. We have already done everything in HTML and CSS and now, in JS, we just need to add a class drag-over-effect to the drop area.
First use the built-in ondragover() function that will execute, when the file is over the drop area. Use preventDefault() to stop usual actions. Use the same for each function as used above and get each file and use typeValidation() function. If the type is correct then add class.
File Leave Drop Area
Use ondragleave() function that will execute when the file leaves the drop area. Just remove the class that we added before.
On File Drop
Here, ondrop() built-in function is used to drop files. First, use preventdefault() to prevent opening files in a new tab. Then remove the drag-over-effect class that added on dragging over the drop area. Then, if the browser support DataTransferItemList then get files through getAsFile() function, otherwise use files property.
In the case of the items list, all dropped files are available in e.dataTransfer.items. Use foreach loop to get each item and then get the file using getAsFile() function from that item.
In the case, the browser doesn't support DataTransferItemList, all the dropped files are available in e.dataTransfer.files. Get each file using foreach loop and in this case no need to use getAsFile() function as file is already in the file format. Just do uploading with the upload() function.
Upload File to Server
Now, we have a file and we will upload it to the server. But, before making an HTTP request, we need to add a file list in the HTML. First, display the list area that is hidden initially. Create a list element li and add in-prog class to it. Then add the complete list created in HTML to that li as an HTML element. Make sure to add some variables to that HTML content. First, as the image source, use an iconSelector() function and provide file type as a parameter. It will return the icon name using the file type. We will this function later. Also add, the file name and file size in their given tags. Prepend this whole li to the list container in HTML.
Now, initialize HTTP request XMLHttpRequest() and create a variable that holds FormData(). Append the file to the variable that holds a form.
Use http.open() to open that PHP file that will upload the file and we are using the POST method for requesting. Use http.send() along with the data parameter to send data during the request.
Onload() function of the http object will execute, when the request is completed. So, here, remove the in-prog class and add complete class.
Onprogress() will return the state of file transferring each time when state updates. So, we will use it to show the progress bar and to show the percentage of loaded data. Calculate the percentage using loaded and total data. Then show the percentage in the span and update the progress bar.
We will also use the abort functionality. When the user clicks on the cross button, the request will abort and the list will remove from HTML.
Icon Selector Function
This function works on the basis of file type. First, it will split the type on the basis of "/" and get the first index. If the first index is application then it takes the second index otherwise takes the first index. We have already set the icon's name on the basis of the file type as image.png, video.png, and pdf.png. Just add .png at the end of the type in splitType variable. Now, it becomes the icon's name and returns it.
PHP File
As we use a PHP file to upload our file to the server. This PHP file just takes the file from JS and uploads it to the server in the uploads folder. Make sure to create an uploads folder in the root directory where this PHP file exists. Basename() returns the file name and $targetFilePath give the complete new path to the file. Move_uploaded_file() will transfer the file from temp location to the new location.
Final Thoughts
Uploading files with drag and drop interface is easier for users and enhance the UI of the website. It's also easier to upload multiple files using drag and drop. We create this application in pure Javascript without getting help from any third-party library. So, this is more amazing and editable for you. Get the complete source code given below and check out a live demo of the project. Also, get help from the youtube video below.
